
We all know the famous star of Excel functions VLOOKUP. It is commonly used for looking up values with a unique Id. But this is not the only function that can be used for looking up values in Excel. There are many other functions and formulas that can be used to lookup value. In this article, I will introduce you with all these Excel lookup functions and formulas. Some are even better than the VLOOKUP function in Excel. So, read to the end.
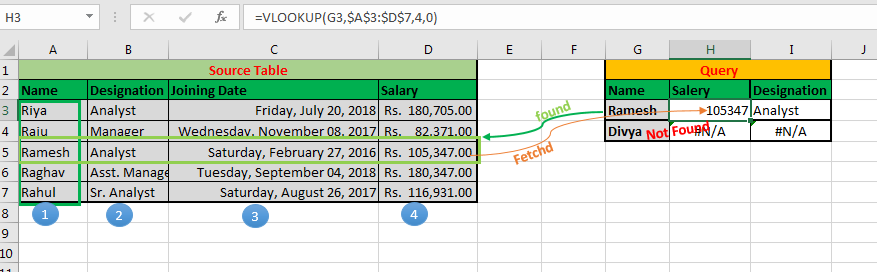
The first excel lookup function is of course the VLOOKUP function. This function is famous for a reason. We can use this function to do more than just a lookup. But the basic task of this function is to lookup values in the table, from left to right.
Syntax of VLOOKUP function:
| =VLOOKUP(lookup_value, table_array, col_index_number, [range_lookup]) |
Lookup_value: The value by which you want to search in the first column of Table Array.
Table_array: The Table in which you want to look up/search
col_index_number: The column number in Table Array from which you want to fetch results.
[range_lookup]: FALSE if you want to search for exact value, TRUE if you want an approximate match.
Advantages of VLOOKUP:
Disadvantages:
You can read about this Excel Lookup Formula in detail here.
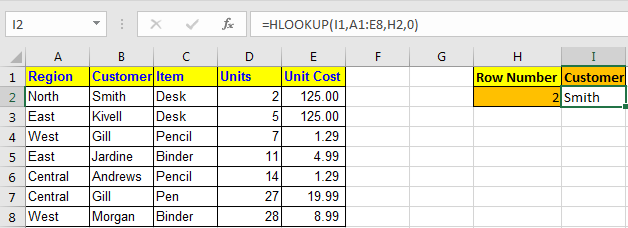
The HLOOKUP function is the missing part of the VLOOKUP function. The HLOOKUP function is used to lookup values horizontally. In other words, when you want to lookup a value in Excel by matching value in columns and get values from rows, then we use the HLOOKUP function. This is exactly the apposite of the VLOOKUP function.
Syntax of HLOOKUP
Advantages of HLOOKUP Function:
Disadvantages:
You can learn about this Excel lookup function here.
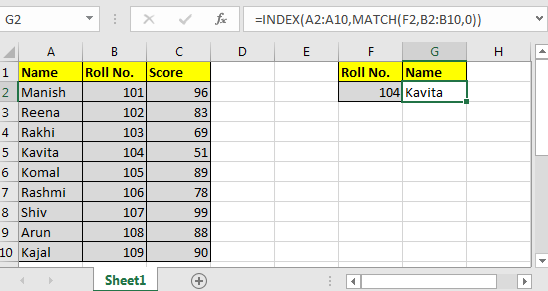
Where VLOOKUP and HLOOKUP can't reach, this formula can reach. This is the best lookup formula in Excel till Excel 2016 (XLOOKUP is on the way).
The Generic Formula of INDEX MATCH
Result_Range: It is the range range from where you want to retrieve value.
Lookup_value: It is the value that you want to match.
Lookup_Range: It is range in which you want to match the lookup value.
Advantages of INDEX-MATCH lookup formula:
Disadvantages:
You can learn about this formula here.
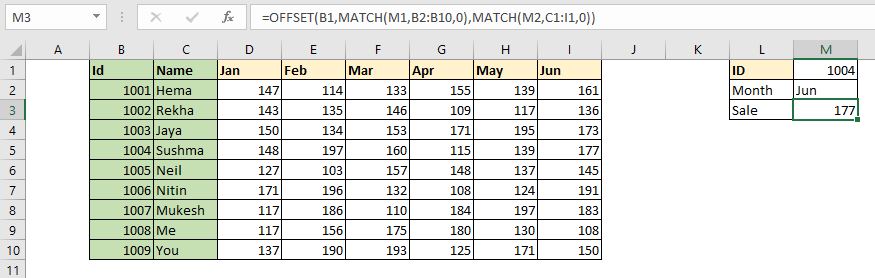
This is another formula that can be used to lookup values dynamically. This excel lookup formula uses the OFFSET function as anchor function and MATCH as a feeder function. Using this formula, we can dynamically retrieve values from a table by looking up in rows and columns.
| =OFFSET(StartCell,MATCH(RowLookupValue,RowLookupRange,0),MATCH(ColLookupValue,ColLookupRange,0)) |
StartCell: This is the starting cell of lookup Table. Let's say if you want to lookup in range A2:A10, then the StartCell will be A1.
RowLookupValue: This is the lookup value that you want to find in rows below the StartCell.
RowLookupRange: This is the range in which you want to lookup the RowLookupValue. It is the range below StartCell (A2:A10).
ColLookupValue: This is the lookup value that you want to find in columns (headers).
ColLookupRange: This is the range in which you want to lookup the ColLookupValue. It is the range on the right hand side of StartCell (like B1:D1).
Advantages of this Excel lookup technique:
Disadvantages:
You can learn about this lookup formula here in detail.
All of the above lookup formulas return the first found value from the array. If there are more than one match they will not return other matches. In that case, this formula comes into action to save the day. This formula returns all the matched values from the list, instead of the first match only.
This formula use INDEX, ROW, and IF functions as main functions. The IFERROR function can be used optionally to handle errors.
Generic Formula
Array: The range from where you want to fetch data.
lookup_value: Your lookup_value that you want to filter.
lookup_value_range: The range in which you want to filter lookup_value.
The first cell in lookup_value range: if your lookup_value range is $A$5:$A$100 then its $A$5.
Important: Everything should be absolute referenced. lookup_value can be relative according to requirement.
Enter it as an array formula. After writing formula hit CTRL+SHIFT+ENTER key to make it an array formula.
As you can see in the gif, it returns all the matches from the excel table.
Advantages:
Disadvantages:
You can learn about this formula here in detail.
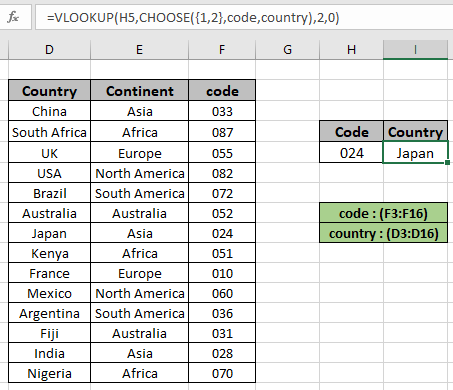 So, most people say that it is not possible to lookup values from the left of the lookup value in Excel using VLOOKUP function. Well, I am sorry to say, but they are wrong. We can lookup to the left of the lookup value in Excel using VLOOKUP function with the help of the CHOOSE function.
Generic Formula:
lookup_value : value to look for
lookup_range : range, where to look lookup_value
req_range : range, where corresponding value is required
2 : second column, num representing the req_range
0 : look for the exact match
In this formula, we basically create a virtual table inside the formula using the CHOOSE function. The CHOOSE function creates a table of two columns. The first column contains the lookup range and the second column contains the result range.
Advantages of VLOOKUP-CHOOSE lookup formula:
Disadvantages:
You can learn about this lookup formula here.
So yeah guys, these are the different lookup functions and formulas. That is not all. There can be many more lookup formulas in Excel that can be created using different combinations of Excel formulas. If you have any special lookup techniques, please share in the comments section below. We will include it in our article with your name.
I hope it was helpful and informative. If you have any doubts regarding this article, ask me in the comments section below.
Related Articles:
10+ New Functions in Excel 2019 and 365: Although the functions available in Excel 2016 and older are enough to work out any kind of calculation and automation, sometimes the formulas get tricky. These kinds of minor but important things are solved in Excel 2019 and 365.
17 Things About Excel VLOOKUP: The VLOOKUP is just not a lookup formula, it is more than that. The VLOOKUP has many other abilities and can be used for multiple purposes. In this article, we explore all the possible uses of VLOOKUP function.
10+ Creative Advanced Excel Charts to Rock Your Dashboard: Excel is a powerful data visualization tool that can be used to create stunning charts in Excel. These 15 advanced excel charts can be used to mesmerize your colleagues and bosses.
4 Creative Target Vs Achievement Charts in Excel: The target vs achievement charts are the most basic and important charts in any business. So it is better to put them most creative way possible. These 4 creative charts can make your dashboards rock the presentation.
Popular Articles:
50 Excel Shortcuts to Increase Your Productivity | Get faster at your task. These 50 shortcuts will make you work even faster on Excel.
How to use Excel VLOOKUP Function| This is one of the most used and popular functions of excel that is used to lookup value from different ranges and sheets.
How to use the Excel COUNTIF Function| Count values with conditions using this amazing function. You don't need to filter your data to count specific values. Countif function is essential to prepare your dashboard.
How to Use SUMIF Function in Excel | This is another dashboard essential function. This helps you sum up values on specific conditions.
The applications/code on this site are distributed as is and without warranties or liability. In no event shall the owner of the copyrights, or the authors of the applications/code be liable for any loss of profit, any problems or any damage resulting from the use or evaluation of the applications/code.


