

In this article, we will learn Different ways to add zeroes (0s) in front in Excel.
Scenario:
Adding Zero in front of the number in Excel. Default Excel doesn't take zeros in front of the number in the cell. Have you ever tried to enter some data like 000123 into Excel? You’ll probably quickly notice Excel will automatically remove the leading zeros from the input number. This can be really annoying if you want those leading zeros in data and don’t know how to make Excel keep them. Fortunately there are quite a few ways to pad your numbers with zeros at the start. In this article, I’ll explain different ways to add or keep those leading zeros to your numbers.
Different functions to add zero (0) in front
As we know TEXT function is the most used function to add 0 in front but here I’ll explain more ways to add zeros (0s) to numbers.
Format as Text
One of the solutions is converting the format of the number to text because if we input 00xyz, excel considers this value as text and keeps its 0 in front. There are different ways to convert a number cell to text format.
Let's understand these methods one by one. Using a custom format to change the format is the easiest way to change the already existing numbers in range. Just select the range and Use shortcut Ctrl + 1 or select More number format from the drop down list on the Home tab showing General.
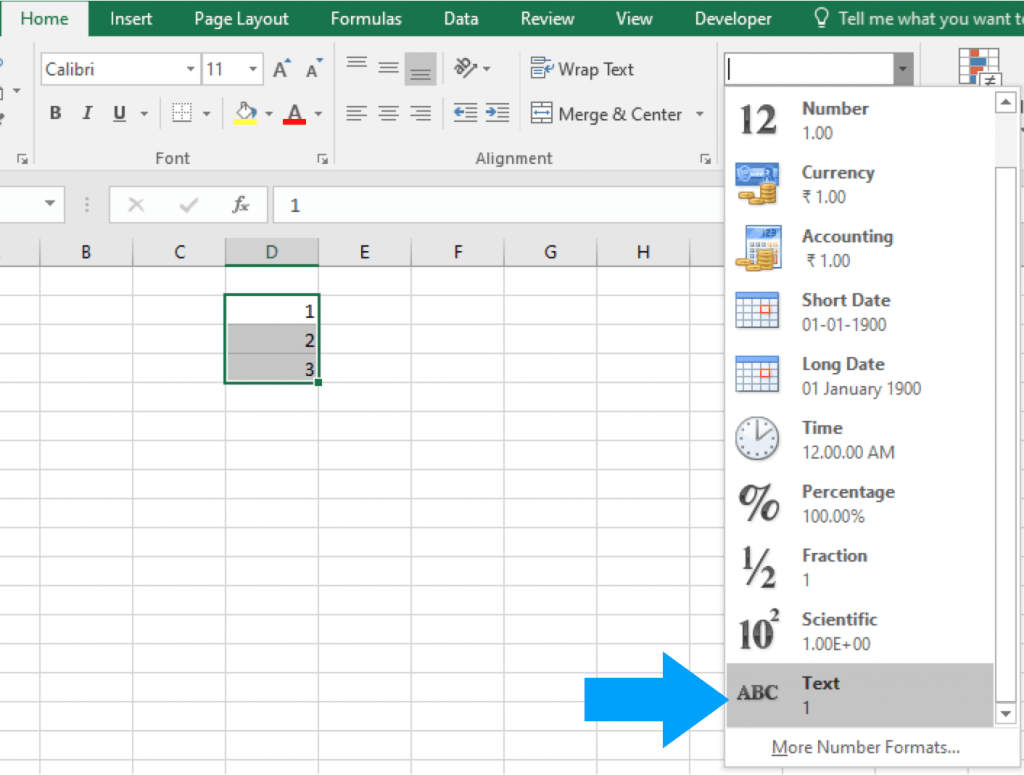
Change the format from General to Text.
Now if you try to enter numbers with leading zeros, they won’t disappear because they are entered as text values instead of numbers. Excel users can add a custom formatting to format numbers with leading zeros.
They will only appear to have leading zeros though. The underlying data won’t be changed into text with the added zeros.
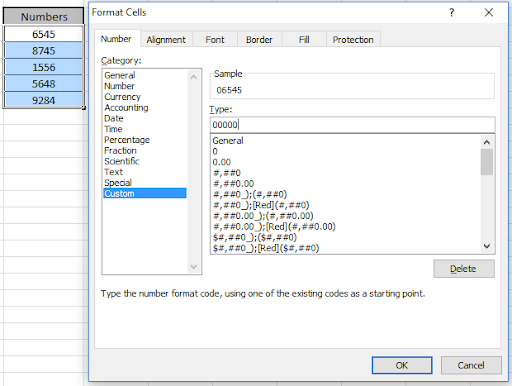
Add a custom format to show leading zeros.
The TEXT function will let you apply a custom formatting to any number data already in your spreadsheet.
= TEXT ( Value, Format)

= TEXT ( B3, "000000" )
If you wanted to add zeros to a number in cell B3 so that the total number of digits is 6, then you can use the above formula.
You can force Excel to enter a number as text by using a leading apostrophe.
This means you’ll be able to keep those zeros in front as you’re entering your data.
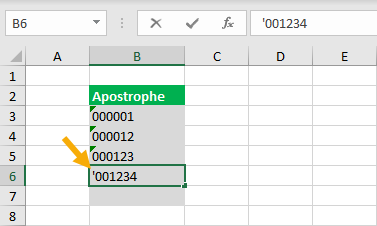
This method is quick and easy while entering data. Just type a ' character before any numbers. This will tell Excel the data is meant to be text and not a number.
When you press Enter, the leading zeros will stay visible in the worksheet. The ' will not be visible in the worksheet, but is still there and can be seen in the formula bar when the active cell cursor is on the cell.
Another way to get your zeros in front with a formula is using the RIGHT function. You can concatenate a string of zeros to the number and then slice off the extras using the RIGHT function.
The RIGHT function will extract the rightmost N characters from a text value.
= RIGHT ( Text, [Number])

= RIGHT ( "000000" & B3, 6 )
The above formula will concatenate several zeros to the start of a number in cell B3, then it will return the rightmost 6 characters resulting in some leading zeros.
You’ll notice this article describes 9 ways to add leading zeros, but my YouTube video only shows 8 ways.
That’s because I didn’t know you could use the BASE function to add leading zeros until someone mentioned it in the video comments.
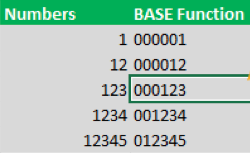
The BASE function allows you to convert a number into a text representation with a given base.
The numbers you usually use are base 10, but you could use this function to convert a base 10 number into a base 2 (binary) representation.
= BASE ( Number, Base, [MinLength])
Use the formula
| =BASE(B3,10,6) |
The above formula will convert a number in cell B3 into base 10 (it’s already a base 10 number but this will keep it as base 10) and convert it to a text value with at least 6 characters. If the converted value is less than 6 characters, it will pad the value with zeros to get a minimum of 6 characters.
Definitely a cool new use for a function I otherwise never use.
Add zero (0) only in front of numbers not on text values
Here we will consider the scenario which covers both text and numbers values in the same list. Now excel considers each cell different in terms of format. Now how to let excel know that if the cell has a number value then add 0 in front or else if the cell has text or any other value, then leave it as it is.
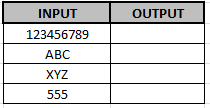
For this we will use a combination of two functions IF and ISNUMBER function. Here we have some values to try on.
The Generic formula goes on like
=IF(ISNUMBER(cell_ref),"0"&cell_ref, cell_ref)
Here
cell_ref : cell reference of the corresponding cell
Use the formula in cell
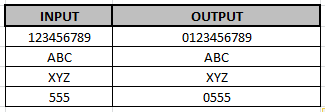
| =IF(ISNUMBER(F3),"0"&F3, F3) |
Explanation: The ISNUMBER function checks the cell for number. IF function checks if the cell has a number then it adds zero in front of the number else it just returns the cell value.
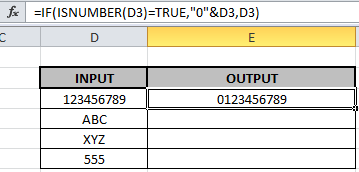
As you can see in the above image the zero (0) is added in front of the number. Let's check if this function works on other values. Copy the formula in other cells, select the cells taking the first cell where the formula is already applied, use shortcut key Ctrl+D
it will pad the value with zeros to get a minimum of one zero in front of characters. Definitely a cool new use for a function I otherwise never use.
There is another option to add zeros into the pivot table. You can add them into a calculated column in Power Pivot. This way you can use the new column in the Filter, Rows or Column area of a pivot table.
= FORMAT ( Numbers[Number], "000000" )
In the Power Pivot add-in, you can add a new column and use the FORMAT function to create leading zeros in the column with a formula like above. A calculated column calculates a value for each row, so there is no need to wrap the function inside a cell. Now you can use this new column inside a pivot table’s Rows area just like any other column of data.
Summary
It can be frustrating to see all your zeros disappear when we don’t know why it’s happening or how to prevent it. As you can see, there are lots of ways to make sure all those zeros stick around in your data. Whatever your requirement, there is surely a good solution for you.
Here are all the observational notes using the formula in Excel
Notes :
Hope this article about Different ways to add zeroes (0s) in front in Excel is explanatory. Find more articles on calculating values and related Excel formulas here. If you liked our blogs, share it with your friends on Facebook. And also you can follow us on Twitter and Facebook. We would love to hear from you, do let us know how we can improve, complement or innovate our work and make it better for you. Write to us at info@exceltip.com.
Related Articles :
Excel REPLACE vs SUBSTITUTE function: The REPLACE and SUBSTITUTE functions are the most misunderstood functions. To find and replace a given text we use the SUBSTITUTE function. Where REPLACE is used to replace a number of characters in string.
Replace text from end of a string starting from variable position: To replace text from the end of the string, we use the REPLACE function. The REPLACE function use the position of text in the string to replace.
How to Check if a string contains one of many texts in Excel: To check if a string contains any of multiple texts, we use this formula. We use the SUM function to sum up all the matches and then perform a logic to check if the string contains any of the multiple strings.
Count Cells that contain specific text: A simple COUNTIF function will do the magic. To count the number of multiple cells that contain a given string we use the wildcard operator with the COUNTIF function.
Popular Articles :
50 Excel Shortcuts to Increase Your Productivity : Get faster at your tasks in Excel. These shortcuts will help you increase your work efficiency in Excel.
How to use the VLOOKUP Function in Excel : This is one of the most used and popular functions of excel that is used to lookup value from different ranges and sheets.
How to use the IF Function in Excel : The IF statement in Excel checks the condition and returns a specific value if the condition is TRUE or returns another specific value if FALSE.
How to use the SUMIF Function in Excel : This is another dashboard essential function. This helps you sum up values on specific conditions.
How to use the COUNTIF Function in Excel : Count values with conditions using this amazing function. You don't need to filter your data to count specific values. Countif function is essential to prepare your dashboard.
The applications/code on this site are distributed as is and without warranties or liability. In no event shall the owner of the copyrights, or the authors of the applications/code be liable for any loss of profit, any problems or any damage resulting from the use or evaluation of the applications/code.


Saved me a lot of time. Great article.
Thank you so much. Bless!!
Exellent
How to add this eg 2,5,4a,6,7,3d
Ans should be 27 while addition we should neglect a and d
Hi,
You can split numbers from string and sum them up. You can use this article,
https://www.exceltip.com/excel-text-formulas/split-numbers-and-text-from-string-in-excel.html
thanks so much! I've lost so much time trying to manipulate text to columns to get this done. amazing!
good job
Maybe this helps, I tried it seems to work out fine.
select the cells
Cell properties
custom : \0#
It will add a 0.
when saving to .csv and rename to file to .txt you will see the 0 added.
Name,Phone
Name1,0333
Name2,04444
Name3,0666666
Name 4,055555
Name5,088888888
above ones with \0#
below is default
Name1,333
Name2,4444
Name3,666666
Name 4,55555
Name5,88888888
Thank you for helping me solve this issue.
Thanks!
What if i wanted to add the 0 in front of text?
use Concatenate Function to add 0 in front of a text
=concatenate("0",text)
or
use
="0"&"text"
understand concatenate function here
https://www.exceltip.com/tips/concatenate-formula-in-microsoft-excel.html
how to convert later 254
19-20/ 254 formula pls helpme
You can use formula
=CONCATENATE ("19-20/ ",number)
or
"19-20/ "&number
THNX
this is not working in google sheet same result comes up
Try =text(cell number,"the zeros you need"). That should work. I just did this in google sheet
what if there are 2 types of digit numbers. 1 hv 10 digits, and other 11 digits. how to seperate it?
I want to use the zero in front of any number only in some cells, those are account numbers. Since the accounts belong to different banks so they all needn't zero in front of them.
This means What I type that should remain in that format only, like Word. But while I use TEXT format in Excel, it converts them in SCIENTIFIC format, Then I've to click each of them to correct formatting of each such cell.
Isn't that possible to make a formula to convert the numbers (in the pasted sheets of 'Word' into 'Excel') starting with a special number must have zero & remains not?
THANKS FOR THE INFO 🙂
THANK YOU SO MUCH...
Right click on the tab—>Select Format Cells->select Custom->Select 00000->zero will be inserted before the number.
Right click on the tab--->Select Format Cells->select special->Select zip code->zero will be inserted before the number.
Hi I need help with home work and I cant do box methid sorry
This is great, thank you.
Very helpful technique !
non of these are working
What if the cell you want to add a 0 in front of includes numbers and text? For example, I want to add a 0 in front of:
909 - Design Project Engineer
910 - Design Project Engineer II
You can use concatenation, explained here in detail.
https://www.exceltip.com/excel-text-editing-and-format/join-first-and-last-name-in-excel.html
i love u so much thank you 🙂
thanx so much..you have made my work easier.
thanx for the quick solution 😉 you saved mah a lot of time